User journeys and information flows
Each app has its own functionality, however, the customer experience follows the same overall flow for apps of the same type. Most apps have an installation or setup phase and an execution phase.
App installation and setup
The app installation, setup, and configuration phases are where a user connects the app to their account, sets any app permissions, enters credentials for the app or the platform the app connects to, and defines any account-level app settings.
App installation
App installation and setup vary depending on whether your app is intended for private use only or you plan to list it in the Exchange marketplace.
Private access apps
If your app is intended only for your use, installation and setup are optional.
To access the configuration page, from the Publish tab, click the three-dot menu for your app, and select Configure.
The configuration page loads as an iframe within the web interface.
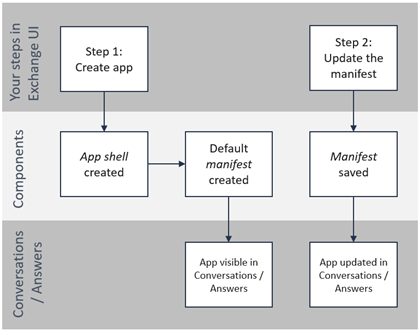
Publicly available apps
If your app is listed in the Exchange marketplace, installation is required for customers to use the app. The setup step is optional, but highly recommended.
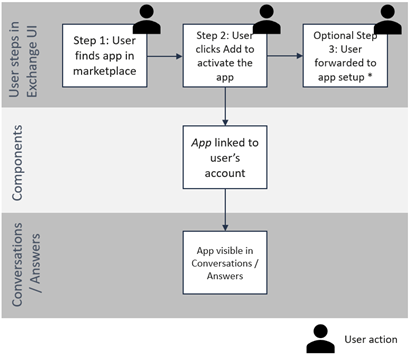
App activation
Users can activate an app by finding the listing on the Exchange marketplace, then clicking the Add button. For Answers bot blocks and Conversations context cards, the app is immediately available and displayed within Answers or Conversations.
Components used:
- App shell
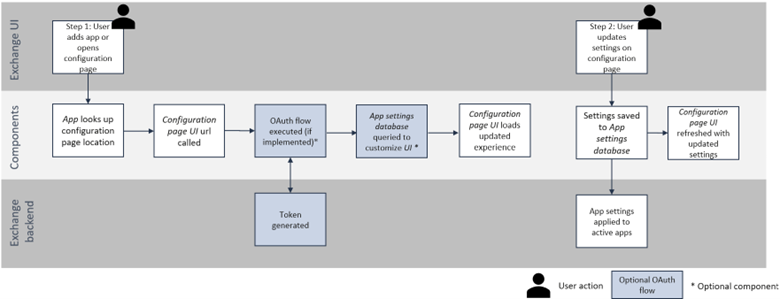
App setup
If a configuration page is defined for an app, users access the app setup immediately after installing the app. Users are forwarded to the Configuration page, which loads as an iframe within the web interface.
Users access the configuration page at any time by finding their installed apps in the My Apps tab of Exchange. To re-open the configuration page (if available), they can click the Open button in the listing. The configuration page loads as an iframe within the web interface.
Components used:
- App shell
- Configuration page UI
- App settings database
App execution
The following sections describe what happens during the app execution phase and the components required for the app types:
- Context card
- Answers bot block
- Moments - Flow element
- People data sync
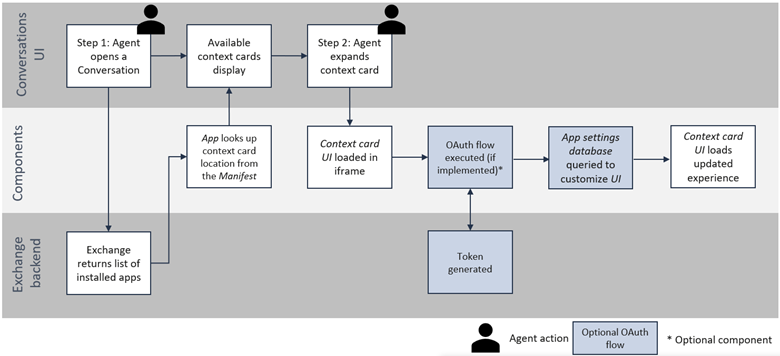
Context card execution (iframe load)
If your context card needs information about the Infobip account, the Conversations agent, or the end user, you need to implement the OAuth flow to capture this information.
Components used during context card execution
- App shell
- Manifest
- Context card UI
- App settings database (if used)
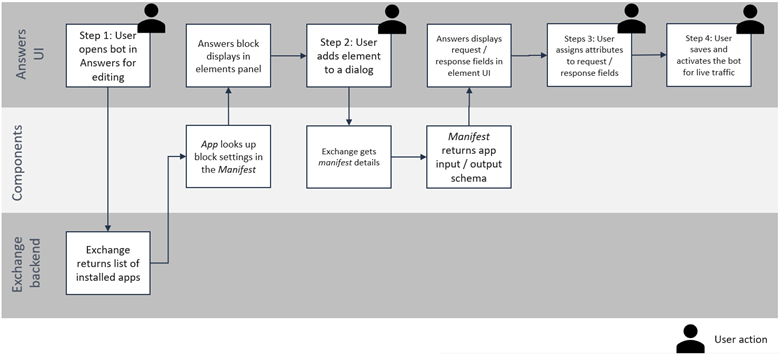
Answers bot block creation
The Answers bot block is available to bot designers in the Answers chatbot editor. Designers can place the bot block at any step of their overall chatbot flow, select input and output fields from the chatbot’s list of attributes, and activate their bot for use. During bot setup, Answers displays all bot blocks activated for that account as chatbot elements. When the block is added to a chatbot flow, the user can select the attributes for the Request and Response, as defined in the app’s Manifest.
Components used during Answers bot block creation
- App shell
- Manifest
- API endpoint
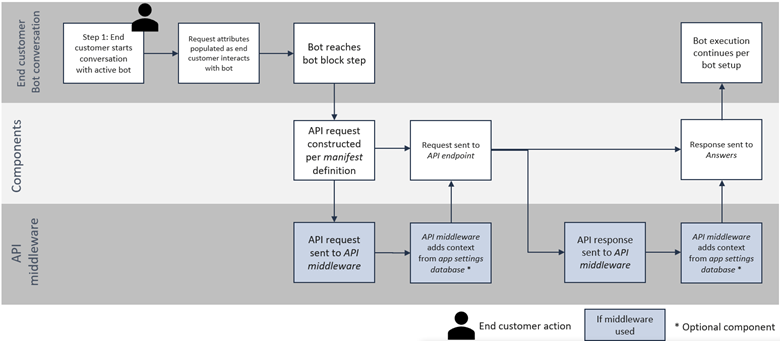
Answers bot block execution
When an Answers bot block is active, and a user interacts with it, the bot block is activated. Answers uses dynamic attributes in the bot to populate the input fields to construct the API call to your endpoint or middleware. As needed, your middleware can translate the call from Answers into the correct format for your API endpoint. Common translations include:
- Adding account details from the App settings database to the API request
- Adding app preferences from the App settings database to the API request
- Restructuring the API request if the API endpoint uses header parameters (Currently only Query and Path parameters are supported by Exchange)
Components used during Answers bot block execution
- App shell
- Manifest
- API endpoint
- API middleware (if used)
- App settings database (if used)
Data available during Answers bot block execution
When executing your app from within Infobip, it calls the endpoint from the request/uri that you specify in your manifest and sends information that identifies the account.
The signature is created based on two elements:
- the timestamp value
- the request body
You can find the signature in one of the 3 headers called “X-Ib-Exchange-Req-Signature”. This header contains the timestamp value followed by the request body you are using, with no blank spaces nor separators as the data (timestamp + body).
Headers:
- X-Ib-Exchange-Req-AccountKey: [Encrypted accountId]
- X-Ib-Exchange-Req-Signature: [Encrypted timestamp + body]
- X-Ib-Exchange-Req-Timestamp: [Raw timestamp]
Example:
    {
      "user-agent": "Java-http-client/20",
      "content-length": "21",
      "content-type": "application/json",
      "x-forwarded-for": "193.105.74.4",
      "x-forwarded-host": "appendpoint.free.beeceptor.com",
      "x-forwarded-proto": "https",
      "x-ib-exchange-req-accountkey": "D8ADC25936426DE0279BC0C4EA791D9B",
      "x-ib-exchange-req-signature": "e5adabc728a6f1a561f13b043e11c1acb0a5cff61948aec691c86d2bd8ff3fcd",
      "x-ib-exchange-req-timestamp": "1689697378017",
      "accept-encoding": "gzip"
    }
Body:
- request body: [Raw Data]
- request sample:
{"email":"[email protected]"} - request sample:
{"order_id": "1212721005877-01"}
Example:
    {
      "order_id": 152512
      "email": "[email protected]"
    }
Validate your signature message
- Get your app's Signing Secret (available in the App Shell).
- Extract the timestamp from the X-Ib-Exchange-Req-Timestamp header.
- Concatenate the timestamp and the request body you are using with no spaces nor separators between them to use it as a base_string. For example,
1667951050990{"email":"[email protected]"}for timestamp: 1667951050990 and request body:{"email":"[email protected]"}. - Use your favorite MAC (Message Authentication Code) implementation with the HmacSHA256 algorithm to sign/hash the above base_string using your Signing Secret as a secret key into a hexadecimal string in lowercase.
- Once you have this hexadecimal text, you may compare it with the X-Ib-Exchange-Req-Signature header we sent you on the request.
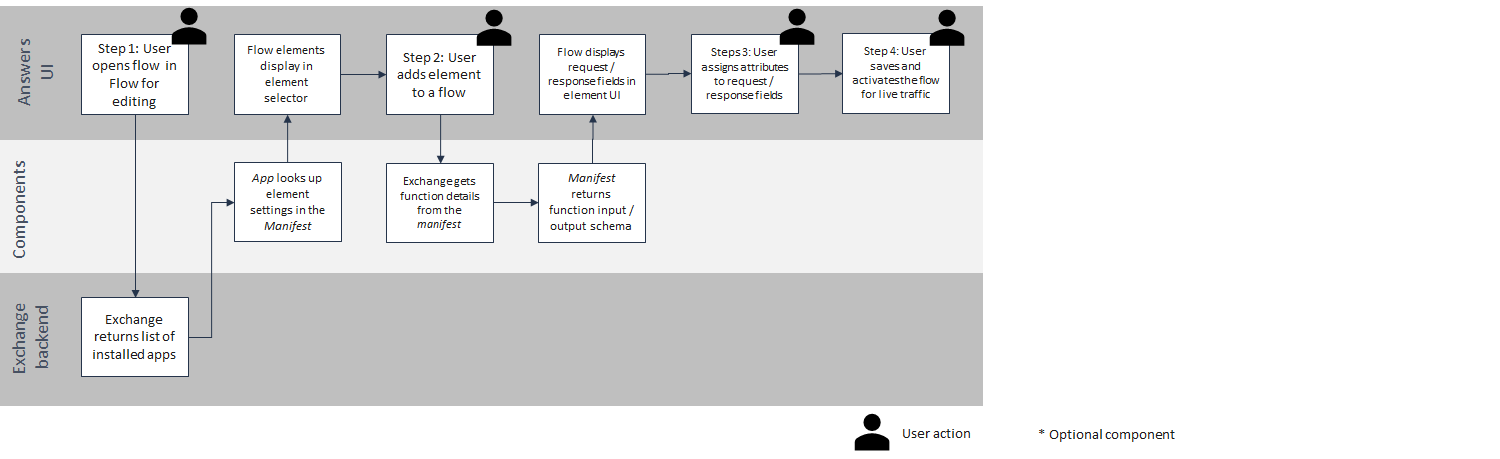
Flow element creation
The Flow element is available in the Flow editor in Moments.
Flow designers can add functions to a customer journey, selecting the input fields and output fields that are visible in the side panel. Each function is shown in the Select element list under Integrations.
When the Flow element is used in a customer journey, the user can select the fields that are defined in the manifest.
Components used during Flow element creation
- App shell
- Manifest
- API endpoint
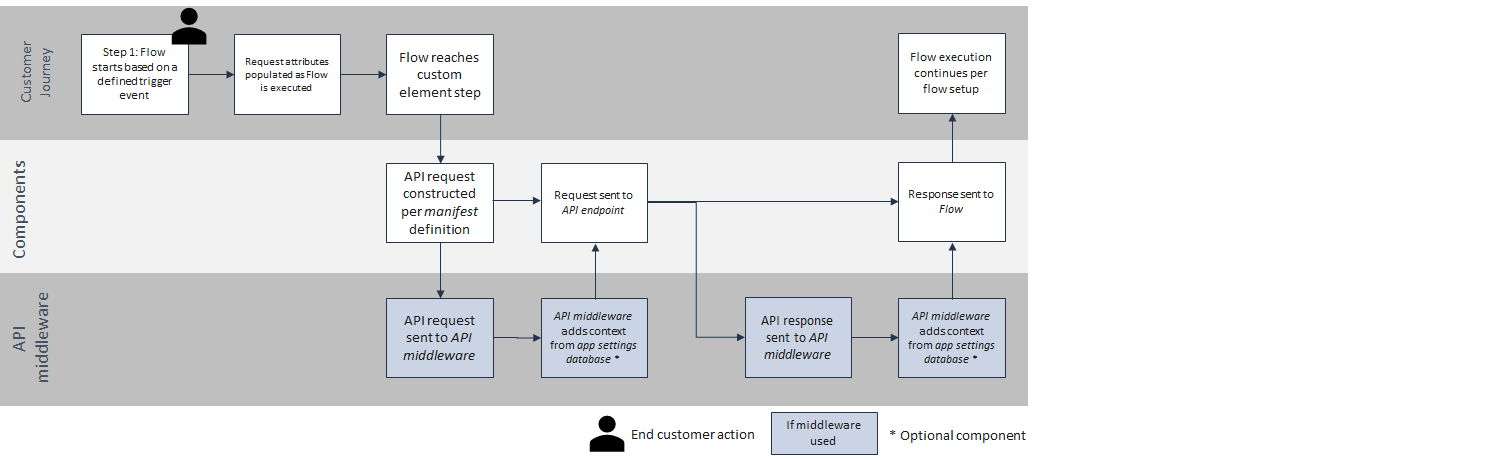
Flow element execution
When a trigger event starts a customer journey flow, the requested attributes are populated. As the flow encounters a Flow element, the attributes are used to populate the input fields to construct the API call directly to the endpoint or to your middleware. Middleware can translate the call from Flow into the correct format for your API endpoint where you are adding account details or app preferences from an app settings database.
Components used during Flow element execution
- App shell
- Manifest
- API endpoint
- API middleware (if used)
People data sync execution
Depending on the needs of your app, you may want to push data from your third-party platform to People CDP, from People CDP to your third-party platform, or both. Your app middleware orchestrates the flow of data between the two platforms. Platform credentials and data mapping setup should be defined in the App setup phase.
- To push data from third party platforms, use the tools available in the third party to identify recent changes, and use the People API (opens in a new tab) to create or update profile information.
- To push data from People API to third party platforms, check for new or modified Person profiles (opens in a new tab) at regular intervals. Use modifiedAt and createdAt to identify the recent changes, then use the third party platform’s tools to push the data.
Components used during People data sync execution
- App shell (optional, used only for marketplace listings)
- API middleware
- API endpoint
- App settings database (if used)