Unable to verify SPF record despite having less than 10 lookups
The case
When setting up email authentication for your domain, it’s crucial to ensure that your SPF (Sender Policy Framework) records are correctly configured. Despite registering your domain, implementing the necessary DNS (Domain Name System) records, and keeping SPF lookups below the allowed limit of 10, you may still encounter verification issues. One common problem is having multiple SPF records instead of the single allowed record, which can disrupt email validation processes.
What is SPF?
The Sender Policy Framework (SPF) is an email authentication protocol that helps to identify and prevent email spoofing by verifying the legitimacy of the sender’s server.
When an incoming email reaches the recipient’s server, the server verifies the SPF record of the sender’s domain to ensure that the email originates from an authorized IP address. If the sending server’s IP address does not match those listed in the SPF record, the email may be flagged as suspicious, marked as spam, or rejected outright. This verification process helps reduce the risk of phishing, email forgery, and other malicious activities, enhancing overall email security and integrity.
Implementing SPF is a critical step in maintaining email deliverability and protecting the reputation of an organization’s domain by ensuring that only authorized servers can send emails on its behalf.
Steps to resolve the issue
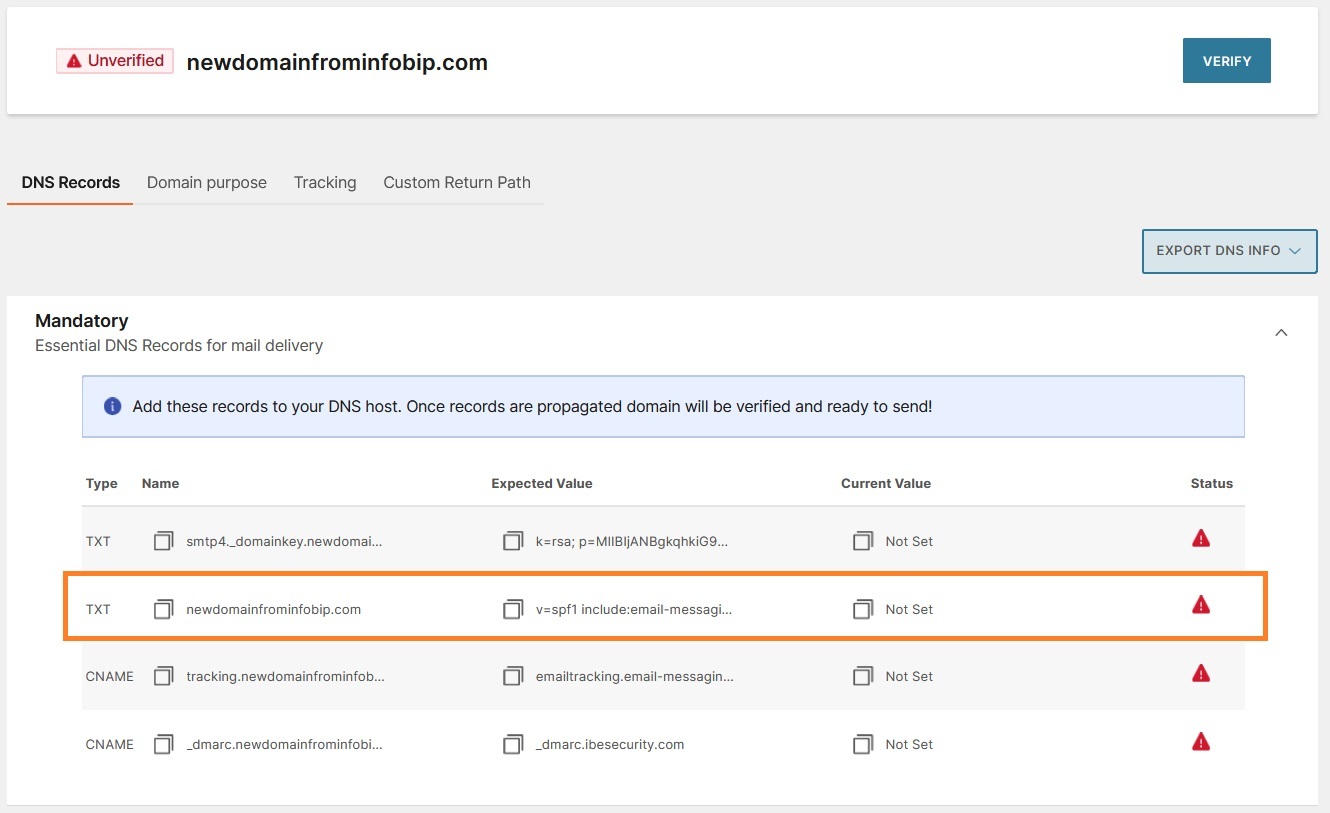
Step 1: Review SPF record provided in your Infobip account
Begin by logging in to your Infobip account and navigating to Channels and Numbers → Channels → Email → Marketing and Transactional.
Here, you will find a list of all your domains. Find the domain you wish to verify and click on the three vertical dots (menu icon) next to the domain name, then select Manage to open the domain settings page.

Once there, locate the DNS Records section and review the SPF record details, which will show you the expected SPF record values for verification.
Step 2: Compare expected and configured SPF records
Retrieve your existing SPF records using DNS lookup tools like MXToolbox, or by reaching out to your DNS hosting provider for assistance. Once you have your current SPF records, compare them against the expected records listed in your Infobip account, paying close attention to any inconsistencies, such as multiple SPF records or mismatched values.
For instance, if your domain is “domain.co.uk,” you might find the current SPF record configured as follows:

However, the SPF record provided in your Infobip account is as shown below:

This indicates that there are currently two different SPF records associated with your domain, which need to be consolidated into a single record.
Step 3: Consolidate SPF records
To consolidate your SPF records, merge all authorized servers and mechanisms from the multiple records into a single, comprehensive SPF record. This consolidated record should include all legitimate sending sources and comply with SPF syntax rules.
Ensure that the final SPF record is formatted correctly, with no duplicate values: there should only be one version number (v=spf1) and one “all” mechanism (-all or ~all).
In the example provided below, multiple occurrences of the version number and “all” mechanism are highlighted in red to indicate the need for removal of duplicates. The remaining parts of the record, marked in black, should remain unchanged and can be arranged in any order.

Once the duplicates are eliminated, your final SPF record should appear as follows:

Step 4: Verify the SPF record
To ensure the accuracy of your updated SPF record, use SPF validation tools such as Dmarcian. This tool will help you identify any syntax errors, redundant lookups, or other issues that could impact SPF validation. Validate your merged SPF to confirm that it meets SPF standards and is correctly configured.
Step 5: Update DNS records
Update your DNS settings with your DNS hosting provider by replacing any existing multiple SPF records with the newly consolidated SPF record. It may take up to 48 hours for these DNS changes to propagate fully. During this period, some servers might still reference the old configuration, which could lead to temporary inconsistencies.
By following these steps, you will ensure that your SPF records are properly configured, which will help improve your email deliverability and authentication standards.
Step 6: Contact Support
If you have followed the recommendations above and are still having issues with your SPF record, please don’t hesitate to contact our Support team for further assistance.
You can reach our Support team via [email protected].
Please provide the following information:
– Domain Name: The specific domain experiencing verification issues.

