GenAI Custom prompt
EARLY ACCESS
Use this element to produce custom output based on your instructions.
Example: The following are some examples of what you can ask the element to do.
- Summarize the input text.
- Rewrite or create variations of the input text.
- Translate the input text.
- Obtain information from the end user.
- Generate a JSON file in a specific format based on user input. You can then use the file to interact with an API.
- Create a financial plan based on parameters such as annual income and current savings.
Prerequisites
Contact your Infobip account manager to activate AI features in your account.
Key features
- Add custom prompts to your chatbot design.
- Define and refine prompts.
- Remember message history.
- Generate variations, translations, or writing styles.
- Extract parameters such as email addresses and telephone numbers.
- Full customization.
Configure the element
To add the GenAI custom prompt element to your chatbot, drag it from Apps from Exchange. Complete the following fields.
Choose function
Select whether the GenAI model will use the conversation history during the chat with the end user.
- Prompt with conversation history: Use this option if you want the GenAI custom prompt element to use the conversation history as context or reference to generate a response.
- Prompt without conversation history: The GenAI model does not remember the conversation history. Select this option for use cases where GenAI needs to provide specific information that does not need the conversation history. Example: Information about legal documents.
Request
Provide instructions for the chatbot to perform the task. Complete the following fields.
User Message
Specify the message sent by the end user. This field is applicable only if the Choose function field is Prompt with conversation history.
You can do one of the following:
- Select the text attribute that contains the end user's message.
- Specify the predefined attribute, lastReceivedTextMessage.
Prompt instruction and System message
The prompt instruction and system message instruct the LLM to generate the required output.
The following table shows the prompt template and an example of the system message template. In the example, the end user is asked to share their email address so that they can be contacted later. The goal for GenAI is to extract the email address in JSON format. You can then extract the required variables through the Code element and store the value.
Use the prompt template as it is.
| Prompt template | System message template |
|---|---|
| - The user message from which you need extract email is: **{query_str}** - Return only the requested data without additional information. - If information is not provided - write null | - Your role is to extract the email from the user message. - The user's query will be delimited with: ** - The result should be in JSON format with the key: email - Do not format the output |
Memory sharing (optional)
Share information, such as conversation context, between multiple GenAI custom prompt elements to improve their performance.
Use a memory key as the identifier for the shared information. In the Memory key field, either create a new memory key or enter an existing one. All elements that use this memory key get access to the shared information.
If you do not add a memory key, the GenAI custom prompt element shares the information with other GenAI custom prompt elements that also do not have a memory key.
The Memory sharing field is applicable only if the Choose function field is set to Prompt with conversation history.
Output tokens (Optional)
Configure the maximum number of tokens that the tool can use in a response.
If you use a low value in this field, the response is truncated. If you use custom prompt to generate a text response, we recommend to set it at 200 tokens.
Temperature (Optional)
Configure the level of randomness in the generated response.
A response that is generated at a lower temperature can be focused, conventional, and predictable, whereas a response that is generated at a higher temperature can be creative, random, and varied.
Avoid a high temperature because the GenAI model might give incorrect and unclear responses.
Response
Configure the response. For more information, refer to the Response section.
Fallback
Specify the action that the chatbot needs to take if the GenAI custom prompt element fails to execute. For more information, refer to the Fallback section.
Tests (Optional)
Create one or more test cases to check whether GenAI follows the instructions correctly and provides the required response.
In the test case, do the following.
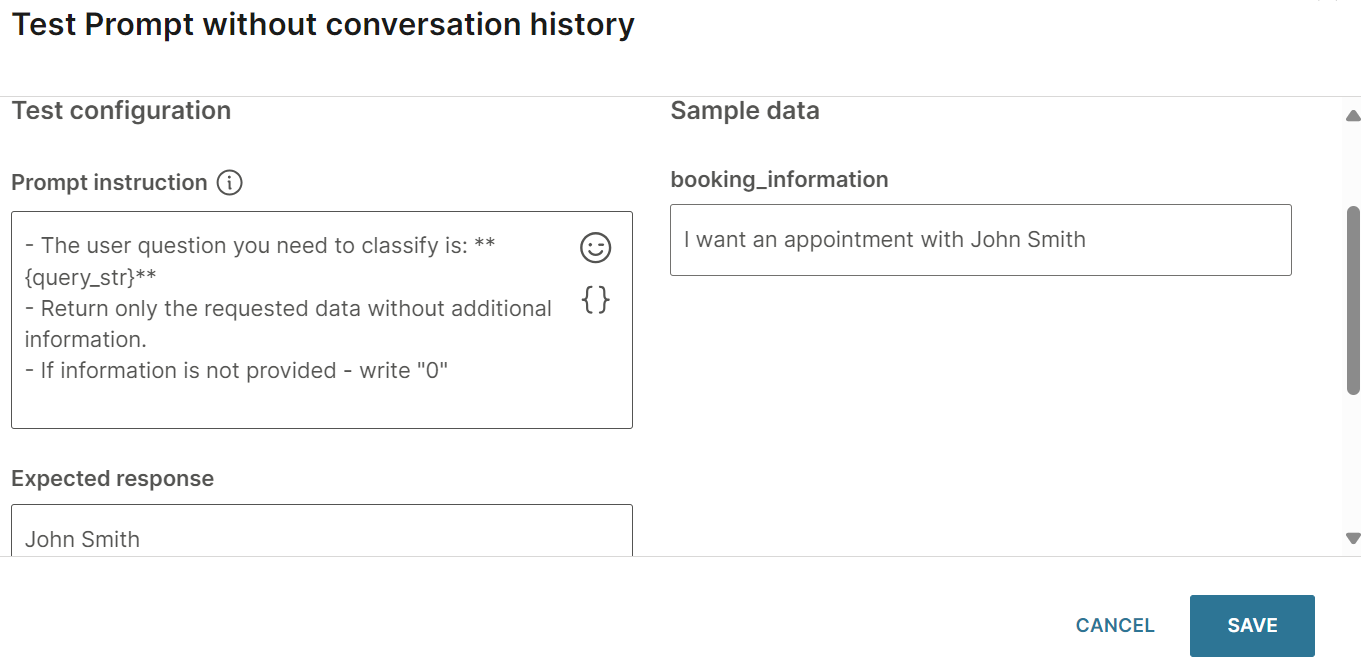
- If you have enabled prompt without conversation history: In the Prompt instruction field, specify a sample message from the end user.
- If you have enabled prompt with conversation history: In the User message field, specify a sample message from the end user.
- If you have used attributes to configure the fields in the element, specify the values of the attributes.
- In the Expected response field, specify the response expected from GenAI.
After you create the test cases, run them, and view the results.
For an example of a test case, refer to the Example section.
For more information about creating and working with test cases, refer to the Test cases section.
Preview the behavior of the element
Enter examples of end user messages and check if the response from GenAI is as expected.
Do the following.
- Select Preview behavior.
- If the Function field is Prompt with conversation history, in the User message field, enter an example of a message from the end user.
- Configure the other fields, if required.
- Select Preview behavior.
The response from GenAI is displayed in the right pane.
If the result is not what you expect, do the following until you get the required output.
- Modify the fields in the Preview section.
- Select Preview behavior.
If the result is as expected, select Apply changes to parameters to update the fields in the GenAI custom prompt element.
For an example of a preview, refer to the Example section.
Example
In this example, the end user is asked to share their email address so that they can be contacted later. The goal for GenAI is to extract the email address in JSON format. You can then extract the required variables through the Code element and store the value.
-
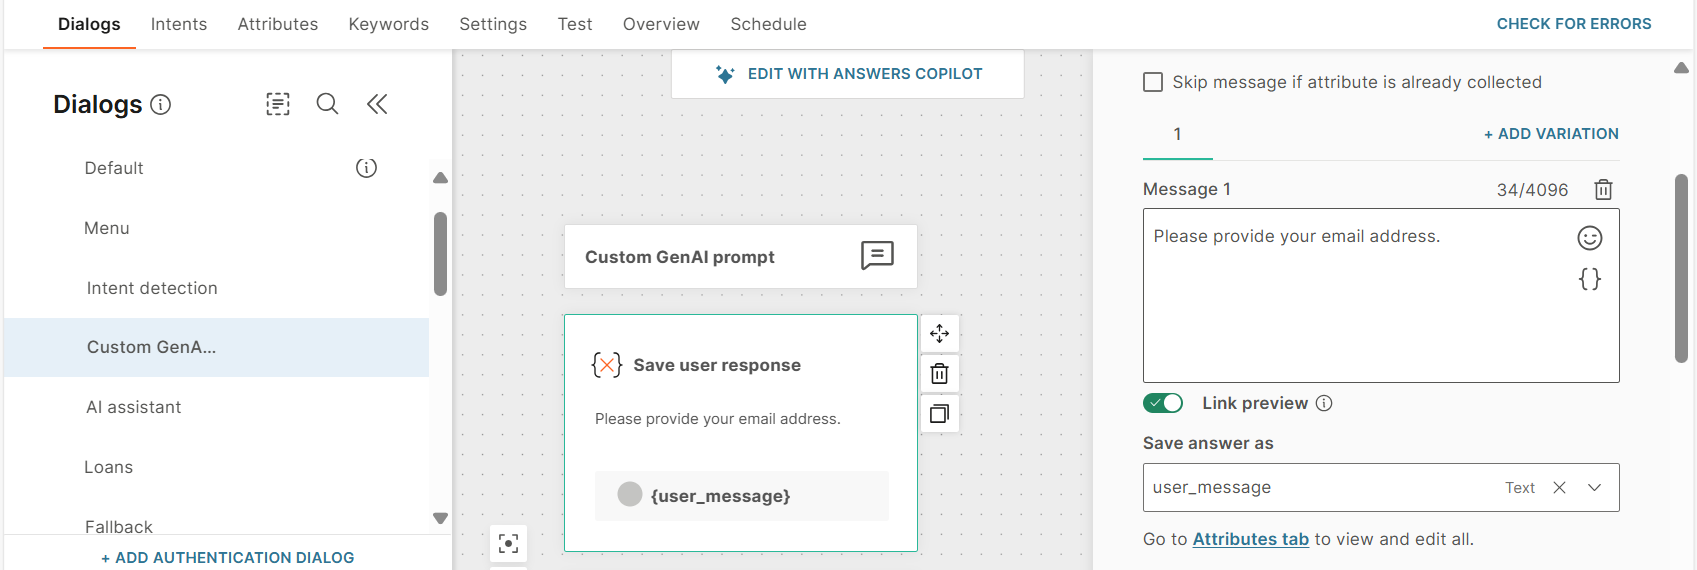
To obtain the email address from the end user and save this information in an attribute, use the Attribute element. In this element, do the following:
- Ask the end user for their email address.
- Store the end user's response in the user_message attribute.
-
Add the GenAI custom prompt element.
-
In the Choose function field, select Prompt with conversation history to enable conversation history.
-
To pass the response from the end user to the GenAI custom prompt element, specify the user_message attribute in the User message field.
-
In the Prompt instruction field, instruct GenAI to obtain information from the end user's message and provide a response.
Use the following prompt.
- The user message from which you need to extract email is: **{query_str}**
- Return only the requested data without additional information.
- If information is not provided - write null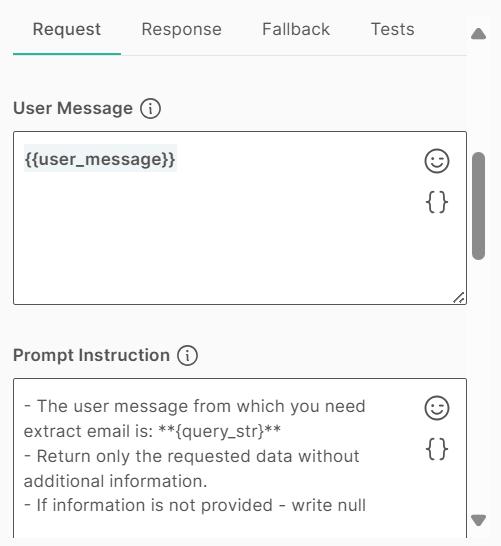
-
In the System message field, use the following content.
- Your role is to extract the email from the user message. - The user's message will be delimited with: ** - The result should be in JSON format with the key: email - Do not format the output -
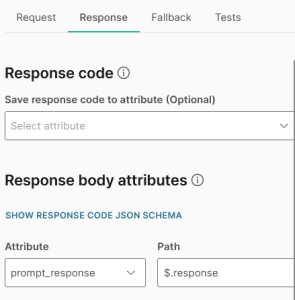
In the Response tab > Response body attributes section, specify the attribute in which GenAI needs to save its response and the associated path.
Example:
Create the attribute, prompt_response, and specify this in the Attribute field.
In the Path field, specify $.response
-
Configure the fields in the Fallback tab.
-
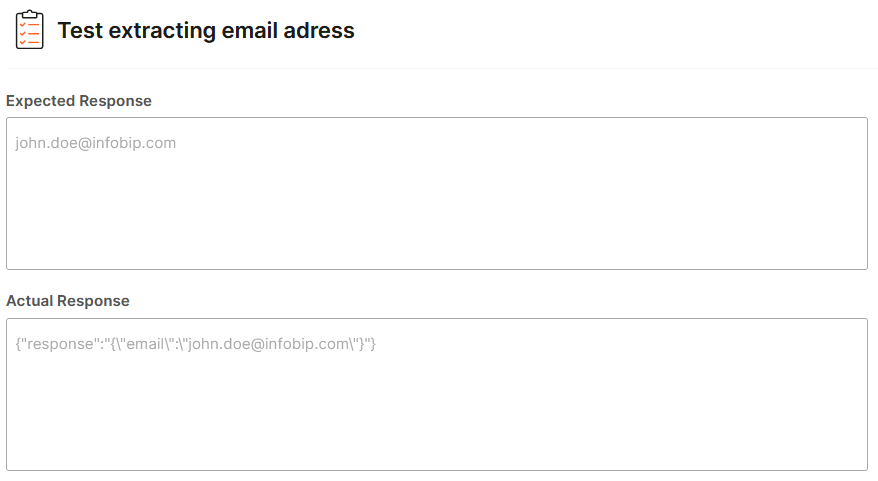
In the Tests tab, create test cases. In each test case, provide a sample end user message, sample email address, and the response expected from GenAI. Example:
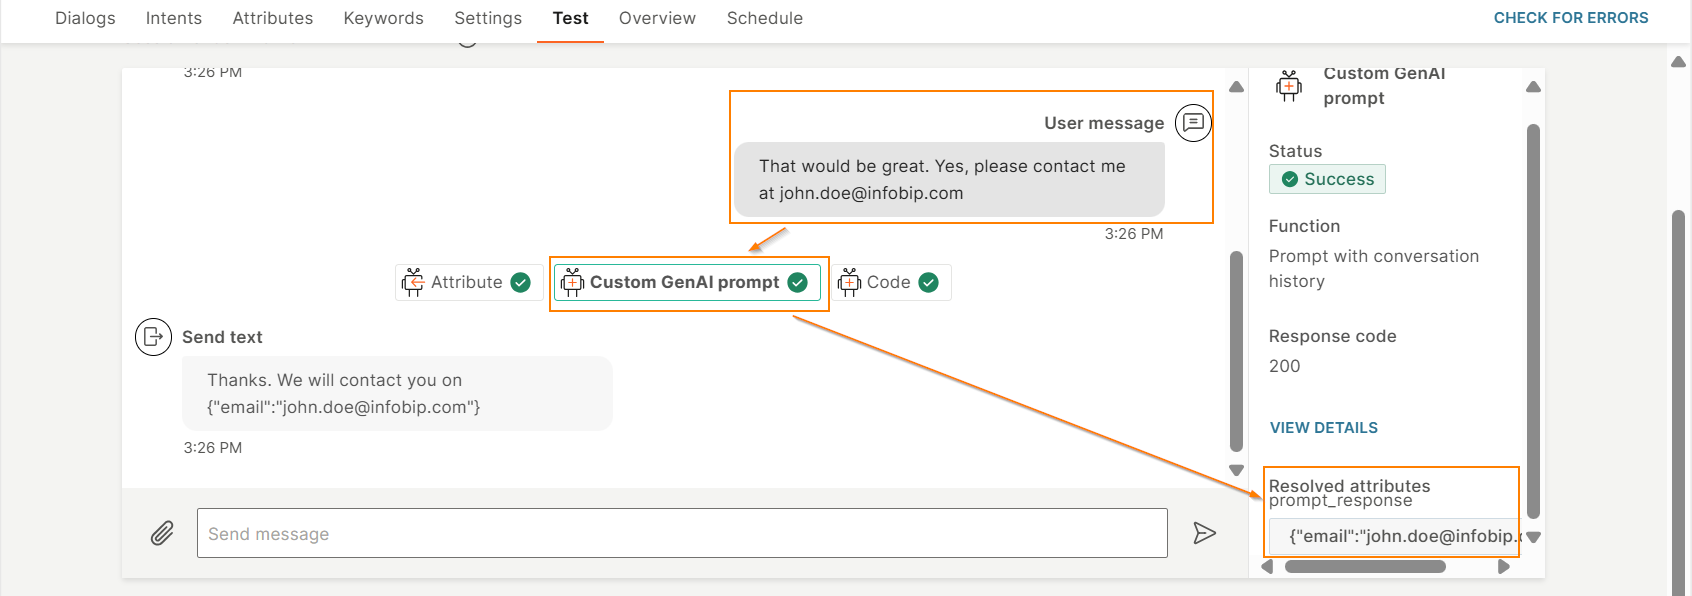
User message is That would be great. Yes, please contact me at john.doe@infobip.com
Sample data is john.doe@infobip.com
Expected response is john.doe@infobip.com
-
Run the test case and view the result to check whether GenAI provides the correct response. Check whether the Actual response matches the Expected response.
-
Preview the behavior of the GenAI custom prompt element. In the preview screen, enter a sample end user message in the User message field and select Preview behavior. Check whether the response in the right pane is correct.
Example:
User message is That would be great. Yes, please contact me at john.doe@infobip.com.
Check whether the response in the right pane is as follows.
{"response":": "{\"email\":\"[email protected]\"}"}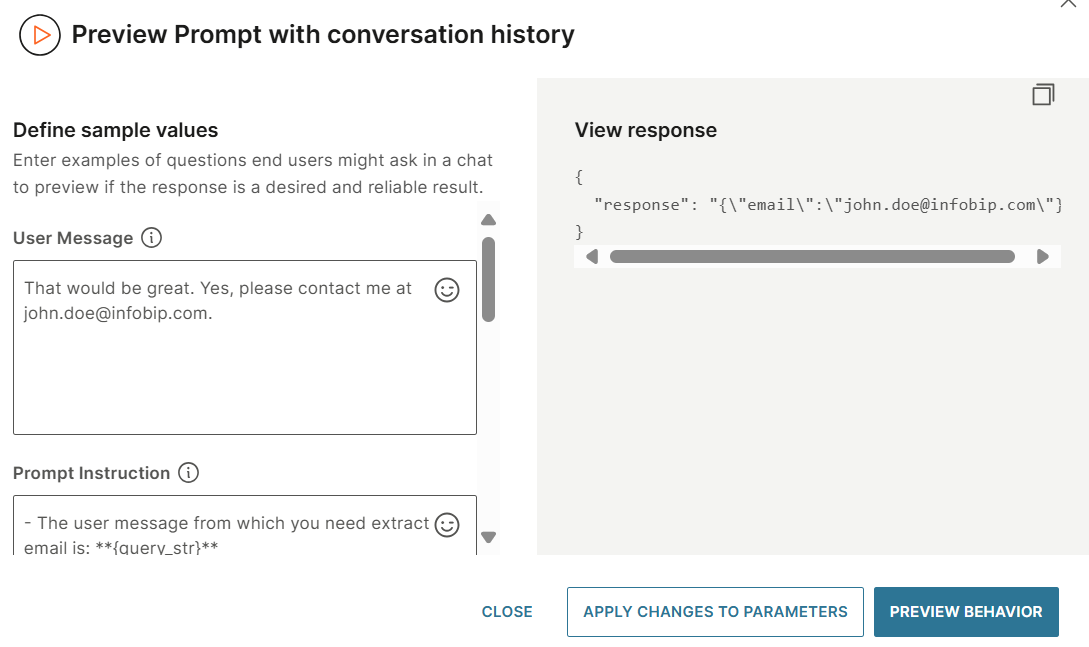
-
Create an attribute to save the information extracted from the end user's message. Create the email_address attribute.
-
Add the Code element after the GenAI custom prompt element to parse the attributes from the end user's message. Save the extracted information into the attribute that you created - email_address.
Example: Use the following code.
    let data = attributeApi.get('prompt_response');
    attributeApi.set('email_address', parsedData["email"]);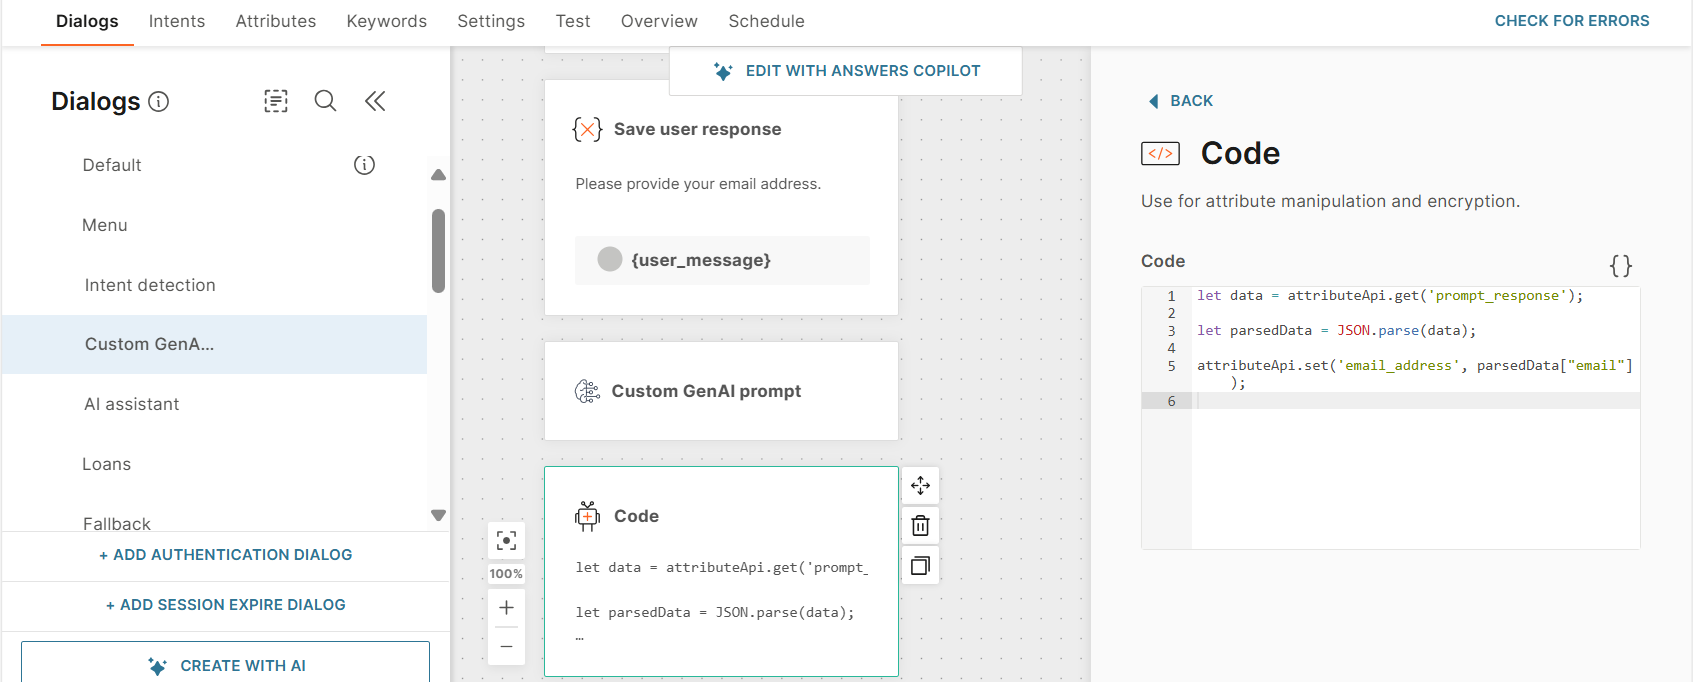
-
Add a Text element to return the response from GenAI. Enter the following information in the element.
Thank you for sharing your email address: {{parsed_data}} -
Test the entire chatbot. In the Test tab of the chatbot, enter the booking information.
Example: Send the message, That would be great. Yes, please contact me at john.doe@infobip.com, to the chatbot. Check whether GenAI returns the correct response.